Wednesday, 2 October 2013

Tamiya Plastic Scriber II Review

- Gunpla Supplies -

Tamiya Plastic Scriber II Review

Hey guys, its been a while since iv'e had any activity on here. So lets start it off with a new review of the Tamiya Plastic Scriber II. Now as you may be able to tell from the picture below, the plastic scriber is also a member of the Tamiya Craft Tools just like the Tamiya Design Knife that I reviewed a bit over a month ago. Just some extra information if your interested - This tool is made in Japan by Tamiya and the blades are from OLFA.

 
 The front tool still inside the retail packaging. On the front side of the item informs you of the following:

  • Ideal for cutting plastic/acrylic boards and scribing panel lines onto plastic models.
  • 2 spare blades included.
  • Retractable blade enhances safety.
  • Narrow blade edge enables easy access to hard to reach areas.


A shot of the back of the packaging. The back instructs you on how to use the tool as well as some caution notes.
The instructions are as follows:
  1. Gently scribe repeatedly until a groove halfway through the board is formed.
  2. Bend outwards to result in a clean break.
  3. Afterwards, use the back of the blade to clean off the edge.
Scribing Plastic Models
  • Use a thin plastic board as a guide
<<CAUTION>>
  • Do not touch the sharp parts of the blade.
  • Retract blade into body when not in use.
  • Keep out of reach of small children.
  • When cutting clear or brittle plastic, scribe deeper lines to avoid damage.
  • If the blade comes into contact with water, dry immediately. 


Front and back shot of the tool itself. As you can see, the body of the tool is made entirely out of plastic. The only metal parts are found in the retracting mechanism and its body as well as the blade itself. The main body consists of a semi-gloss textured plastic with the exception of the spare blades door which has a clear smoke grey look to it. It is a semi-transparent plastic coloured in the same smoke grey colour as the action base that comes with the 'Wings Of Light Expansion Set' for the RG Destiny Gundam. However, just like the rest of the plastic, it too is textured.


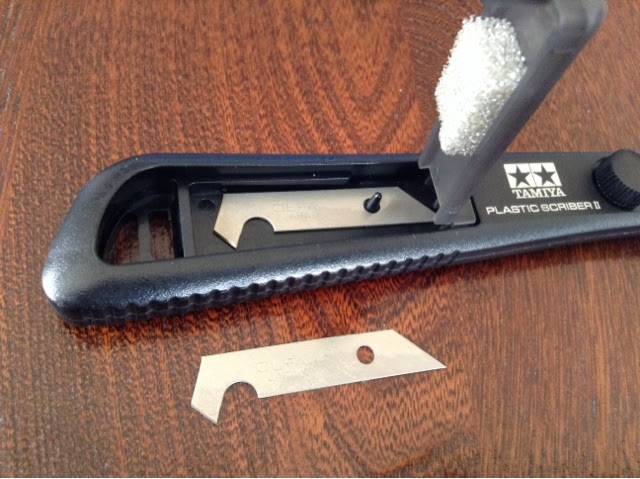
- SPARE BLADES -


The two spare blades are held in this compartment where they are stored straight out of the box. The blades are relatively thin which allows you to be able to store many more blades. This will be quite helpful if you purchased the blade replacement - in which case, you will be able to store the new blades in here to save time for added convenience.



IS THIS THE SCRIBER FOR YOU?

This tool brings a very welcome change and upgrade from the previous Tamiya Plastic Scriber that was orginally released in 1997. The old scriber had a very hefty look to it and is clearly not as ergonomic as the current design of the ver. II. This tool was released in 2009 and still looks appealing without sacrificing build quality.

The textured feel of the scriber feels substantial but still feels a bit slippery. This however may be due to the semi-gloss of the plastic and may have been omitted by use of a matte texture and look to the plastic. However, with all this said, Tamiya has in fact placed grooves on the top portion of the scriber where the index finger sits as well and the bottom end where the tool sits in the arch of your hand. This was a very nice addition and adds alot to the ergonomics of the tool. By doing so, your hand and finger will be able to rest easy while still applying pressure to scribe your desired lines.

Tamiya has been updating their tools and supplies as of the past few years and the new design and additional functionality to the scriber is a very welcome change. With this said, there is only
one design colour for your tool and that is the one featured in this review.

There are countless other alternative scribers for your model kits from countless brands that have countless different form factors and colours but I can assure you, the design of the Tamiya Plastic Scriber offers one of the most comfortable and natural feel among the alternatives.

Overall, the scriber is a very nice addition to the collection of tools and while priced at around $6 AUD, its definitely an affordable tool. If your still uncertain if this is the right one for you, there are myriads of other alternative tools and brands that offer the same function. OLFA offers a 'Scriber S Type' that looks identical to the Tamiya Plastic Scriber II with the exception of a minute design change of the blade and featured in a yellow form factor rather than the Tamiya black and smoke grey variation. Priced just about $1 less than the Tamiya Scriber, the OLFA route might be the way to go. But if your keen on the Black and smoke grey look, an added $1 for the Tamiya is a very nice choice. Brand design might be your thing and if so, the extra $1 couldn't possibly hurt (...could it?). But if your on a budget and don't want to sacrifice the comfortable feel, the yellow OLFA model is still a very nice addition to the tool tray and offers just as much bang for your buck.

Well that about does it for this review guys. I hope this helps all of you out there and as always, thanks so much for viewing and tune in again soon for more updates, reviews and gunpla related content. Enjoy!

If your a member on the new hobbylinktv site, click on the link to see my profile. 
Always room for more friends!
I also am currently selling items on ebay so have a look if your interested at all.
http://myworld.ebay.com/bauihobby/
Any questions? Leave a comment if you have one or just wanna say something.

Tuesday, 27 August 2013

Tamiya Design Knife Review

- Gunpla Supplies -

Tamiya Design Knife

Hey guys, today I decided to make a review of the 'Tamiya Design Knife' under the 'Tamiya Craft Tools' series. I was in a position where I was still using a box-cutter/craft knife as a modeler's knife alternative and although that still worked very well, I wanted to up my game a little bit and encountered a situation where I wasn't sure which of the myriads of modeler's knives I should buy. When I decided to do some research, there were barely any information on it, just online stores selling the product. So now iv'e decided to write up a review to help assist other modeler's in their decision.


The front and the back of the packaging. As you can see, it comes with a cap, the blades and the body. The back of the packaging has information on how to use the knife and its different purposes as well as informing you of the blade container. 


The safety cap, the body and the blade container


The safety cap will help you from cutting yourself. Although it fits onto the top end of the body, it will not attach to the bottom end. Although this is a very minor issue, you can accidentally misplace the cap or just forget where you had placed it.


The top compartment of the blade container will be use to hold all your new blades. The bottom compartment is reserved for storage of broken or dulled blades. This will help ensure for a safe disposal.


Inside the container is 6 packs of 5 blades. A total of 30 blades.
the blades do last a while and so the 30 blades will last you until forever. However, if you do end up using all of the 30 blades, it is still amazing value for $8. The blades however are all identical so if you are looking for a knife that comes with different angled blades... then this isn't the one for you. However, for most modeler's the blade will serve its purpose and will excel in comparison to a craft knife.


As you can see, the design knife has a very nice look to it and a very nice feel to it as well. The paneled design to the body is very comfortable and appealing as opposed to the tube-like design of the X-Acto knife that may detract from the ergonomic appeal to the knife as well the comfortable feel in the hand. The design is much like a pencil, allowing for a very nice and comfortable feel, assisting the precision of your cut.


A comparison of the design knife with my previous cutting apparatus. Clearly superior in cutting ability and precision control.

IS THIS THE KNIFE FOR YOU?

Although this was originally designed and released in 1997, the design still has a very nice aesthetic appeal to it. It also comes with 30 replaceable blades that will last an eternity. However, if you do manage to use up all the blades, you can always just buy another. For the $8 price tag, it's awesome value, it's something that you don't even have to think twice about spending your hard earned money for. In saying this though, the blades are smaller than some blades out there and perhaps larger than others. The smaller size of the blades however may allow you to gain more control when compared to a design knife with a larger blade such as the newer 'Tamiya Modeler's Knife'. This solely depends on the individual and their preferences.

The golden section of the design knife is not just coated, resulting in a shiny golden color even when scratched and dented. The silver section holding the blade in place however is just plastic coated in silver and although I haven't actually scratched or dented the plastic, it might just be helpful to be wary of this. You may or may not end up scratching the paint off, but only time and use will help determine whether the plastic is just coated or molded in the silver color.

It may be helpful to know that the safety cap is not compatible with the bottom end of the design knife and will only fit only the top end, protecting the blade from damage and moisture. Just be wary of this so you don't end up misplacing the cap.

The pencil like design of the knife is very comfortable and will help you gain more precision in your cutting. However, this is solely from my experience in the transition from a design knife. If you are currently in the same position as I was before, you will not regret purchasing this.

Well I guess that about does it for this review. Like I said before, I decided to write up this review because I know some of you out there are looking for a good modelling knife for your plamo kits and there isn't much information out there regarding this particular product. I hope this helps all of you out there and as always, thanks so much for viewing and tune in again soon for more updates, reviews and gunpla related content. Enjoy!


If your a member on the new hobbylinktv site, click on the link to see my profile. 
Always room for more friends!
I also am currently selling items on ebay so have a look if your interested at all.
http://myworld.ebay.com/bauihobby/
Any questions? Leave a comment if you have one or just wanna say something.

Tuesday, 20 August 2013

RG Zeta Unboxing

 - Gunpla Unboxing-

RG Zeta Gundam Unboxing 

So guys here's an unboxing of the RG Zeta Gundam. My box got a bit crushed in the corner during the shipping process so I decided to just use a stock image for the front view of the box - and the fact that my pictures came out a bit blurry didn't help. So i'm sorry guys for the pictures coming out a bit blurry, I decided to use the DSLR but didn't have a tripod available to use so the slightest movement without flash will produce a blurry picture.


As always - as expected of an RG Gundam, the cover art looks amazing. the level of detail is phenomenal and the little details you can see on the Zeta in the box art is always present in the kit itself.


An angled view of the front box art as well as the side display showcasing the transformation process and its stages. It looks very nice and detailed. It also has a picture of the completed RG Zeta unpainted alongside the runners necessary to complete the build. 


This side showcases the kit's posability and awesomeness. Unpainted of course. This side also informs you of the price tag - 3000 yen or around $33 aud.

You may notice that the box has a different cover art on the all sides, much unlike most other gundam kits which generally have two sides that look exactly the same minus the pricing tag on one end. One side shows the Zeta's head and upper body whereas the other end shows the Zeta in its transformed mode.


When lifting off the first half of the box, you are greeted with the pictures of the Zeta Gundam in all its other forms and scales.


RUNNER RUNDOWN


Here is the runner for the inner frame (MS Joint). As you can see, the Zeta has a completely different frame when compared to the other RG's and as a matter of fact, when compared to pretty much any Gundam kit.


Here is the A plate. All the yellow is going to come from this runner as well as all the off white/grey. The dark grey located on this runner is slightly lighter than the grey found on the other runners. It's closer to a medium grey than a dark grey. The clear pieces on this runner are also already colored for you in a clear blue. A very nice color, it looks a little light but we'll see how that goes when the kit is completed.


The first bag of runners also comes with the beam sabers for the beam rifle. It is a 1/144 scale beam saber. It's actually the exact same beam sabers as what you get in the MG Astray Red Frame (with the exception of color) for the bow form of it's Tactical Arms II and beam torch.


The E plate here has all the red colored pieces. The majority of the pieces are going to be used on his extra armaments such as the shield and his backpack.


The H plate holds all the white pieces of the Zeta.


The D runners.


The G plates.


This is a comparison of the two runners of beam sabers that come with the kit. The smaller fits only in the beam rifle and is too small for the beam saber entry input points.


The C plate holds all the black pieces for the kit and almost all of the pieces are used for the flyer.


The F plate. Used to add onto the MS joints to give a much more substantial feel and look. As you can see, this is the same runner but the camera produced a different color when contrasting the colors on the yellow backdrop. The color of the actually runner is closer to the second picture but ever so slightly lighter.


And the last runner is the I runner, where the rest of the blue pieces are found.

EXTRAS


Of course you get the instruction/construction booklet. Instructing you in how to construct the gundam and where to place the decals.


The large decal sheet for the Zeta


A leaflet advertising the Zeta head display that came with a hobby magazine in Japan. I've already got it (bought it along with the Zeta).


A small piece of paper with a QR code which directs you to the Gundam.info site or it's Japanese counterpart.


And the last thing that came with my Zeta is the RG Booklet. This booklet only came with the first batch of the RG Zeta's and has information about all the other previous RG kits as well as CG images of them in action.

Like I said before guys, i'm really sorry that the picture quality wasn't as well as should be expected and will try to spend more time with getting the perfect pictures for all of you guys. As always, thanks so much for viewing and tune in again soon for more updates, reviews and gunpla related content. Enjoy!

If your a member on the new hobbylinktv site, click on the link to see my profile. 
Always room for more friends!
I also am currently selling items on ebay so have a look if your interested at all.
http://myworld.ebay.com/bauihobby/
Any questions? Leave a comment if you have one or just wanna say something.